Sunday, November 28, 2010

AC to Non-AC- why spend 150 on a box when you can do it yourself for around $40??

The outer box has a known location outside, in relation to the fan blower. The hole by the blower at the 2:00 and the 7:00 position fit both the non-ac and ac heater box.
You can see that there is really not a lot to close up with a non-ac box vs an ac box.


Here is the only gap, which is at the bottom of the box and pretty much out of sight.

Here is a pic of the inner box mounted on the inside and the firewall prior to being cut.
Here Ive traced where I am going to cut:
Here is the hole cut, no inner box installed. Ive cleaned up the edges with a file but will probably still do some fine trimming before I seal everything up.
Inner box back in:
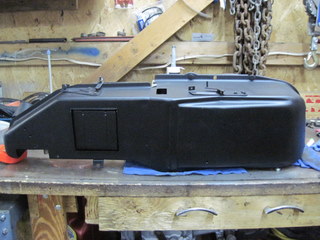
Box before paint, blasting


 Box after blasting


I did not show the pics but I put a shim to cover the gap at the bottom of the box then filled it in and painted that area. Box installed, tidied up, be hard pressed to tell this was an AC car at one time!
Small spot under the box but youll never be able to tell once engine and everything in the car.


Total cost of box overhaul: $40, including paint.
Add in the heater core: $75 total.

Tuesday, October 12, 2010

New Master Cylinder and Prop Valve, Rear brake line

Happy birthday to me, Happy birthday to me...

New master and prop valve, Right Stuff goodies.


Rear brake line from front to back complete.

Wednesday, September 29, 2010

Installing 2nd gen Coil springs (cont)

Drivers side finished.

Installing 2nd gen Coil springs (cont)

Passenger side, finished

Installing 2nd gen Coil springs (cont)


Where the end of this pry bar is is where some "Persuasion" has to be done. We had to lift up on the edge of the coil spring with the pry bar (as shown) and get the end of the coil over the lip so it would sit in the lower control arm spring pocket. As mentioned it takes persuasion. Whereas getting the spring to fall into the pocket required loosening the spring compressor and then installing the spindle, you might have to loosen or tighten the coil spring compressor up for this operation enough to get it over this lip. Not an easy task. BE CAREFUL.

Installing 2nd gen Coil springs (cont)

Crank down and compress the spring. You should compress it until you can fit the spring into the pocket of the lower control arm. This does take a little force. We had the spindle attached to the lower control arm, pushed the spring forward into the pocket, then attached the spindle to the upper control arm ball joint.

Installing 2nd gen Coil springs (cont)

This is how it looks from the underside. Try to hook the hooks as close to the end of the threaded shaft fairly close to the end of the shaft with only a small amount thread coming through. This allows a lot of compression to be made.

Installing 2nd gen Coil springs

Using the Autozone kit, kit#27035 you can install the coil springs just like the tool that GM used to do this with. The long shaft goes through the opening in the top of spring pocket. This shaft is just large enough to sit in this hole. We used a washer in between the frame and bolt head.
Here is the link and a picture to the kit.
http://www.autozone.com/autozone/accessories/OEM-Coil-spring-compressor/_/N-264t?counter=0&filterByKeyWord=coil+spring+compressor&fromString=search&itemIdentifier=555573_0_0_

How to Install coil springs

This is how Corbin and I felt after trying to install the coil springs initially with the coil spring compressor. It was the right compressor, just the wrong technique...

AS ALWAYS, FOLLOW THE INSTRUCTIONS PER YOUR INSTRUCTIONS THAT COME WITH THE COMPRESSOR AND BE AWARE OF THE POTENTIAL HAZARDS. COIL SPRINGS ARE VERY DANGEROUS. I AM NOT A CERFTIFIED MECHANIC AND THIS IS NOT A TECHNICAL BULLETIN OR AUTOMOTIVE MANUAL- FOR REFERENCE ONLY.
JOEL

Upper and lower controls arns installed

Upper controls arms were not a big deal. The lowers on the other hand were no easy chore. I had to grind off some on the ends of the bushings due to the distortion in the subframe where they were.

Springs painted and ready for installation, 1 full coil cut off

Picture of the Spring after rust removal by electrolysis

Simply, the charge breaks down the bond between the Iron and Oxygen (iron oxide= rust). You are left with a very nice surface that is prepped for bonding (less cleanup).

Electrolysis

The springs are all painted and ready for install. I used electolysis to remove the rust from them because blasting was wearing me out. Yes, my nerd side coming through.

Wednesday, September 22, 2010

Upper and lower control arms are painted (bushings installed- Thanks TK)
Not correct (would have been bare metal half way up the arm and the rest as well) but I think it turned out OK. A little bit of sandblasting goes a long way.

Sunday, September 12, 2010


Clutch pedal and the harness. Well harness almost in.

Dash in


Dash is in, steering wheel is in. I used the Krylon Fusion in Semi gloss to paint the column. It turned out very nice. Great to see it looking like a car again!

Taillights are in! I cleaned them up and had to buy a new rear taillight harness. The base bird lights and trans am harness does not interchange- more learning curve things.

Heres another shot of the tank. I put the exhaust in before the tank went in to keep it easy. I had to drop the axle to get the exhaust in- easily...

Got the gas tank painted and reinstalled. I used some rubber strips under the straps. Turned out pretty nice. That is the Rustoleum aluminum color paint, high temperature version. Turned out pretty nice. It looks good with some color under there.

Tuesday, August 31, 2010


The block had new freeze plugs and new cam bearings installed when it went to the shop.

Not too shabby


Reamed the ridge, stone honed the cylinders, a lot of cleaning...

Engine back from being cleaned

Cleaned up pretty good.

Another angle


That paint on that door panel: Yes, I let the kids help. If Im not mistaken one of the boys ruined a new shirt which did not make Monica happy. The boys have good memories though!

Dash painted

Turned out very nice! As well, you can see more of the work on the under dash area.

Windshield pulled


Dave came over and helped me remove the windshield. Thankfully, no rust. Simply sanded and started painting. You can also see that the inside of the car is done and painted. More of my roll on Rustoleum black...

I originally tried to paint with the windshield in but it did not look very good. I was glad I removed the windshield because it ended up cracking (right before I pulled it) and as well, it allowed me to do a thorough job on the dash portion of the cowl.